Business
0
Maximising Effectiveness in Commercial Refrigeration Systems
Refrigeration systems are crucial for industries reliant on food and medicines. They help to keep perishables at an optimal temperature, ensuring that foods and medicines…
A truck is designed to haul all sorts of things that you can’t easily transport in a smaller car. Unfortunately, a lot of wear and…
Epoxy flooring has emerged as a premier choice for commercial and residential spaces alike, offering a seamless blend of durability, aesthetics, and practicality. In Melbourne,…
In the hustle and bustle of modern life, maintaining a clean and tidy home can often fall to the wayside. Whether due to busy…
Children with Attention Deficit Hyperactivity Disorder (ADHD) often face unique challenges in their learning journey. Recognising the diverse ways individuals absorb information, ADHD tutoring utilises multisensory…
Raise your glass to a new way of shopping for wine. Online shopping is a convenient way for consumers to browse and buy rose wine…
Physiotherapy helps in the healing process, prevents muscle imbalances, and improves balance, strength, and flexibility. It can even help you avoid surgery in some cases.…
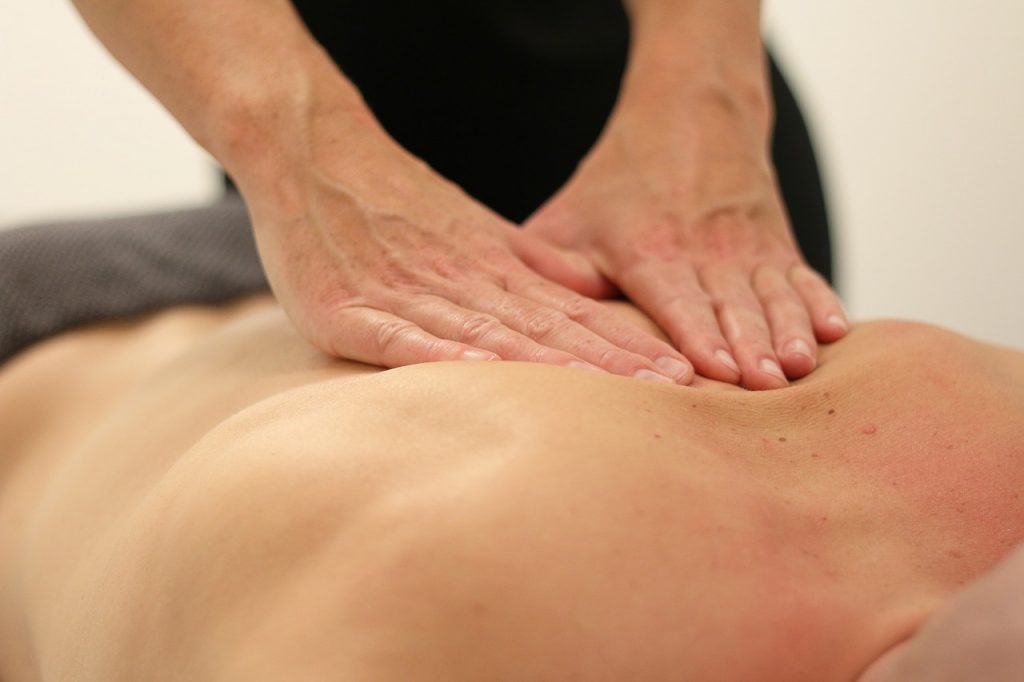
Remedial massage is a hands-on therapy that repairs soft tissue damage, eases pain, and encourages your body to heal itself. It’s an effective treatment for…
Licensed arborists offer many services that can benefit homeowners and their property. From pruning to tree removal, planting to aerating soil, these experts are trained…
Creating an inviting outdoor space involves thoughtful selection and curation of garden furniture, including outdoor dining tables and chairs. In Australia, the convenience of online…
Custom table runners are one of the best ways to grab a prospect’s attention while they’re walking through a crowded space. Printed with your company logo,…
Trees are a major part of our lives. They supply us with life-sustaining oxygen and help prevent soil erosion. However, some trees are more life-takers…
A customized website can help your business grow by creating a distinctive first impression in customers’ minds. It also promotes your brand and increases visibility…
Online wine shopping allows for the exploration of some of the finest bottles in the world. Aside from that, the convenience of having a great…
Pottery wheels are used to throw clay into shapes. They can be found in most pottery studios and sometimes even in people’s homes. Cheaper pottery…
With dozens of websites popping up every day, businesses are struggling to find their niche in the Internet. Luckily, some tried-and-true web design principles can…
If you’re doing a home renovation or have an electrical issue in your house, it’s important to have an electrician to call. Electricians are licensed…
Whether you are looking to start a career in disability or want to improve your skills in the disability sector, there are plenty of courses…
Having a security system is a great way to protect your home from burglars and other threatening situations. It can also provide you with peace…
Regardless of the type of business you are in, an access control system is a crucial tool to help you protect your data. It ensures…
Upholstery adds visual softness to a room, and is a great way to make your furniture more comfortable. Many people choose to use upholstered pieces…
Whether you’ve locked yourself out of your house or you’re locked out of your car, you can call a Locksmith to come out and take…
When it comes to swimming pool design, one of the most important factors is the depth of the water. You will want the pool to…
Bulletproof tires are tires that have been specially designed to protect the car from bullets. These tires are made with high-performance composite materials and special…
If you want to remove graffiti from your business, you have to take several safety precautions. You need to work in a well-ventilated area and…
Individuals have a myriad of options when they need roof repairs. They can choose from traditional shingles, slate and terracotta tiles, metal, and Colorbond® metal…
When it comes to driveways, there are many different types of concrete you can choose from. Those with exposed aggregates, for instance, are a good…
One of the best things about taking voice and singing lessons online is that you can do them from anywhere with an internet connection. That…
When you fall from a height, roof safety harnesses and roof anchor points Melbourne systems can help prevent injury. Roof safety harnesses come in different…
Laser hair removal is a common cosmetic procedure that uses concentrated light to permanently eliminate unwanted hair. It targets hair follicles, which are small cavities…
Replica Eames chairs are made of high quality materials. They have the sleek look of the original Eames chair and are available in a large…
When it comes to running a business, there are a lot of things to think about. From making sure you’re following all the necessary legal…
As a business owner, you know that in order to be successful, you need to have a strong online presence. This means having a website…
Learning how to worship acoustic guitar can be a very rewarding experience. Not only will you learn how to play some beautiful worship songs, but…
An electrician is a skilled professional who is trained to work with electrical wiring and circuitry. If you are experiencing problems with your electrical system,…
If you are experiencing foot pain, you may be wondering who you should see for treatment: your Chiropractor or Podiatrist. Both professions offer unique benefits…
Google Ads and SEO can be extremely beneficial for tradies. In this blog post, we will discuss the benefits of using these marketing strategies and…
Comments Off on How to Become a Professional Web Developer
How to Become a Professional Web Developer
Do you want to become a professional web developer? If so, you’re in the right place! In this blog post, we will discuss the steps…
Commercial cleaning is a multi-billion dollar industry, and it’s only getting bigger. If you’re thinking of starting your own commercial cleaning franchise business, now is…
Ground penetrating radar (GPR) is a technology that is used to see through solid objects. It works by sending out a signal and measuring the…
When you think of a dentist, what comes to mind? Chances are, you think about someone who helps you maintain your oral health. And that’s…
If you are a brewer, you know the importance of having a good connection between your fittings and hoses. A poor connection can cause problems…
Arts and crafts are a great way to express yourself creatively. They can also be a lot of fun! In this blog post, we will…
Comments Off on The Fascinating History of Parliament House
The Fascinating History of Parliament House
Parliament House is a building located in East Melbourne, Victoria. It has been the home of the Parliament of Australia since 1927. The building was…
3D printing microturbines is a process of 3D printing parts for microturbines. The 3D printed parts are then assembled to create the microturbine. 3D printing…
Gardening is one of the most popular hobbies that a person can have. If you have a backyard which is large enough to house some…
Search engine optimization or practiceedge healthcare marketing company is the art of optimizing a web page or website for top search results in search engines.…
There are several factors you should consider before selecting a blinds company. First of all, you need to consider their experience. This is one of…
Divorce is never easy, but it is a necessary part of the human experience. In today’s world, you may feel that your marriage has reached…

A chiropractor Chatswood is a doctor of chiropractic medicine. They specialize in spinal adjustments to improve the functioning of the nervous system and reduce pain.…

Search engine optimisation Castle Hill is an important part of online marketing. It helps you get better rankings in Google and attract more visitors to…
Video Production Melbourne is a creative video production company that provides a full range of services. The team at Cloakroom Media has decades of professional…
There are several techniques for surface restoration. The most effective graffiti removal is the power-washing method, which consists of a hose attached to a pressure…

Providing service dogs for veterans is a way to help them overcome the challenges associated with their traumatic experiences. A service dog is an animal…
Plumbing is a system of pipes within a building used for the distribution of potable water and removal of waterborne wastes. It is commonly distinguished…

The first step in finding a good local electrician is to make sure that the electrician is licensed. Having a licence makes it legal for…

The first step in any swimming pool renovation is establishing a budget. This is a crucial step because it will determine the scope of the…
Why you need CCTV in your Home is important, whether you live alone or with children. It can help keep your belongings safe and your…

There is a lot to do and see in Diamond Creek, Australia, and there are some great places to go for day trips. Several popular…
Family law Whittlesea is a broad area of the law that focuses on relationships between individuals. Its practice is shaped by social issues and is…
There are several signs that may indicate the need to see a Chiro Woolgoolga. First, pain in the neck and back is a good sign.…

The most popular form of non-profit marketing is social media. This means that an organization can reach a lot of new people with little investment.…
Planning and designing a new kitchen should consider existing elements in the room. It is essential to calculate door clearance when designing your new kitchen,…
If you’ve ever owned a swimming pool, you know how difficult it can be to keep it clean. A professional service can take hours upon…
Heating, ventilation, and air conditioning (HVAC) systems are a common part of most homes, offices, and public buildings. These systems utilize various technologies to circulate…

When you first start thinking about Network Security for Business, you’ll probably wonder about its purpose. This type of protection is essential for your business’s…
One of the easiest ways to decorate your garage for Christmas is to hang holiday-themed garage door banners. These are a relatively inexpensive way to…
While it may be tempting to purchase premade flags, custom banners are an ideal solution for your business. They allow you to add a personalized…

It’s tempting to substitute ingredients and make alterations when baking. But that’s just a recipe sabotage, and these eleven Baking Tips can help you avoid…
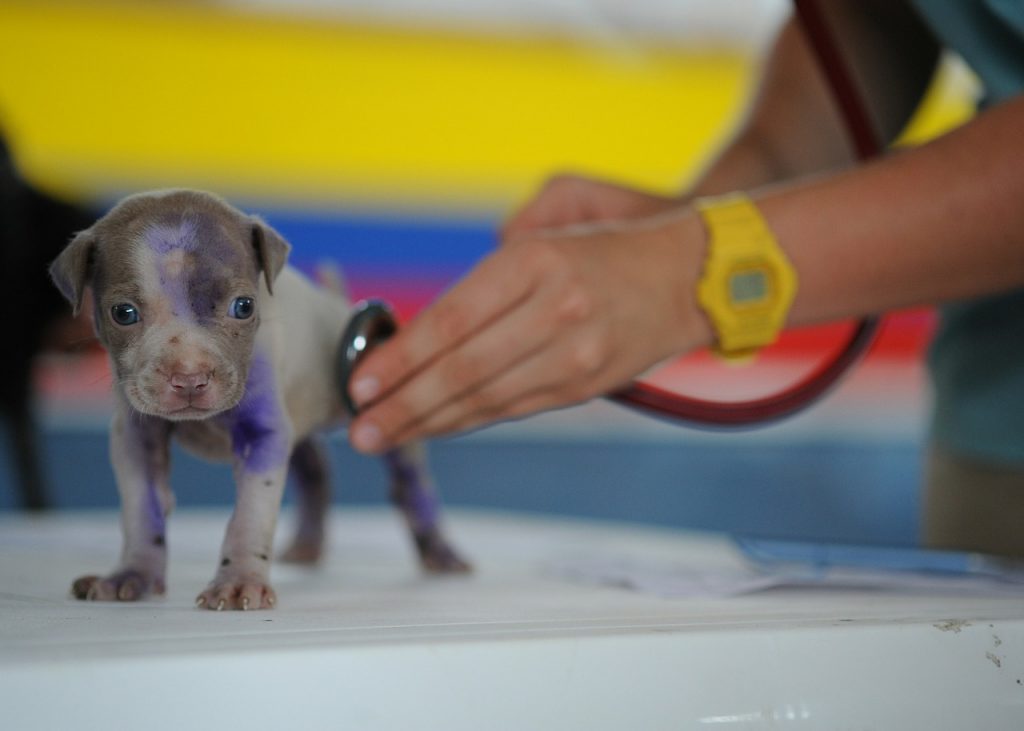
The first step in diagnosing heart disease in a pet is auscultation. This test is used to assess the strength and rhythm of the pulse.…

There are several reasons to use an accountant in Malvern. An experienced accountant can help you make the most of your financial situation. An experienced…
A web designer seattle is the creative process of organizing, conceptualizing, planning and coding the content on a web site. Today, web design goes well…
If you are in Melbourne or have just bought a house, then you would have surely heard about the term “Melbourne mortgage broker”. But what…
C-suite coaching nashville either make or break an organization. They have a key role to play when it comes to ensuring that the business is…
The use of signages in schools prove to be very beneficial to old and new students, parents, visitors, and employees. The importance of school signage…
Are you nervous about the upcoming yarra river cruises christmas party and do not know what to bring along with you? There is no need…
When businesses seek an marketing agency, a new website design or development or graphic design Columbia they turn to the professionals. Digital Marketing agencies have…